So yesterday kicked off the start of the Development for a custom launcher login system.
We figured that developing a ‘static’ kind of login system would not be useful as we have many users from Gamers to Game Developers and everyone will have their own “ways” of wanting to handle the user account management, orders and launcher access.
So instead what we are doing is building a custom launcher login script that will act like a boilerplate. So we will guide you through installing the scripts, setting up the SQL database and getting the basics going, but we will also leave you the full source code to continue to develop and shape the system work how you want, if you so wanted to.
This way, the users are not limited to any kind of linear format for their launcher login.
Some of this below, may look scary, but don’t worry, you don’t have to deal with any of this. This is just a development blog post, showing you the inner workings. When it comes to GLCV3, you will simply upload and configure the script (there will be tutorials) and you just connect the plugin to your script and the launcher will handle it all.
I recommend pre-ordering now before this is complete (you’ll get a discount too).
First Drafts
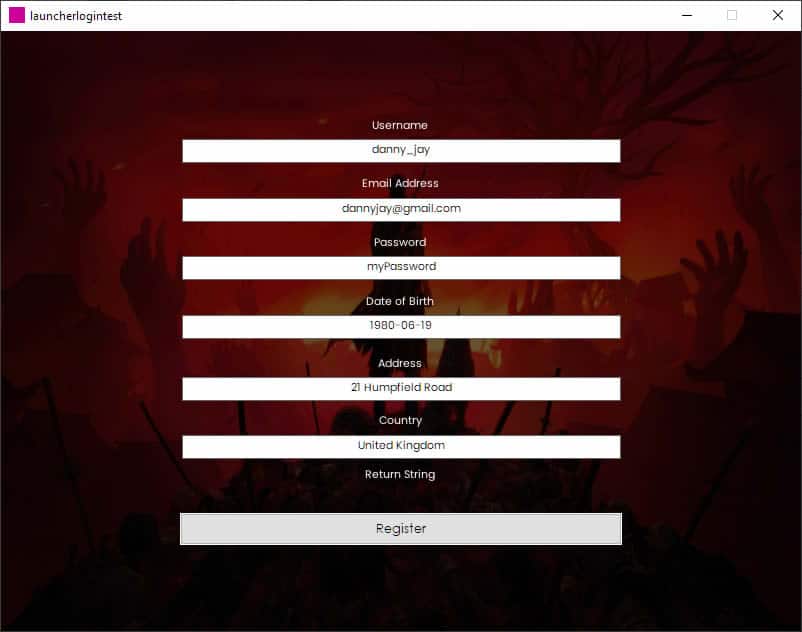
Here is a preview of the first client-side draft.
This is not a preview inside Game Launcher Creator, but rather a quick prototype drafted up using a Game Engine.
Yesterday I setup the SQL structure, here is a preview of what that looks like…
So as you can see we have game_titles for your Game Titles, Roles, Tokens, Users and User Roles.
So the way it will work is, you will list your “Game Titles” then you will assign “Roles” to users. Roles are basically saying who has access to what Game Titles.
Now we have the initial database scheme structured the way we want it (btw, it will expand from this, I can almost guarantee it), today I started developing the registration and login processes.
PHP and SQL for Registration and Logins
This is where things get juicy. PHP and SQL allows us to develop a script that is compatible almost everywhere, as all you need is PHP support and SQL. We are running MariaDB.
So, we are not creating a “front-end” for this asin a PHP web page, we don’t need to. We simply create the PHP scripts to handle the authorisation of registration and login. Later on, we will develop an Admin Dashboard so that Admins can login and handle all the data they need to on the admin side of things.
So for now, we have a basic PHP/SQL implementation of creating a custom launcher registration and launcher login. You can create a client now using any programming language and any game framework such as Unity, UE, Godot, Game Maker etc.
It’s very easy to do, you simply just add POST headers for username, password, email address, date of birth etc. (you can add or remove to/from these yourself if you want).
You then POST the data and the script returns the response, you can choose how you handle the response.
As an example, here is how you would code a registration screen in Unity and handle the responses…
using System.Collections;
using UnityEngine;
using UnityEngine.UI;
using UnityEngine.Networking;
using System.Text;
using SimpleJSON; // You'll need to include a JSON parser like SimpleJSON

public class Registration : MonoBehaviour
{
    public InputField usernameField;
    public InputField emailField;
    public InputField passwordField;
    public InputField dobField;
    public InputField addressField;
    public Dropdown countryDropdown;
    public Text feedbackText;

    private string registerURL = "http://yourdomain.com/register.php"; // Replace with your actual URL

    public void RegisterButton()
    {
        StartCoroutine(RegisterUser());
    }

    IEnumerator RegisterUser()
    {
        WWWForm form = new WWWForm();
        form.AddField("username", usernameField.text);
        form.AddField("email", emailField.text);
        form.AddField("password", passwordField.text);
        form.AddField("dob", dobField.text);
        form.AddField("address", addressField.text);
        form.AddField("country", countryDropdown.options[countryDropdown.value].text);

        UnityWebRequest www = UnityWebRequest.Post(registerURL, form);
        www.SetRequestHeader("User-Agent", "MyApp"); // Set the custom User-Agent header

        yield return www.SendWebRequest();

        if (www.result != UnityWebRequest.Result.Success)
        {
            Debug.LogError(www.error);
            feedbackText.text = "Error: " + www.error;
        }
        else
        {
            JSONNode response = JSON.Parse(www.downloadHandler.text);
            feedbackText.text = response["message"];
            if (response["status"] == "success")
            {
                // Handle the success response
                Debug.Log("Registration successful!");
            }
            else
            {
                // Handle the error response
                Debug.LogError("Registration failed: " + response["message"]);
            }
        }
    }
}
This is easy to write for Unity for example.
All requests should be sent over SSL (https) so that the connection between client and server is encrypted.
Passwords are stored as hashes on the server, they are encrypted for user security and privacy.
I’ll continue to develop this in the upcoming weeks, hopeful for a Christmas release. In the meantime, I will keep posting to this blog (you can subscribe to the right hand side) for more updates as I continue developing.
